- How the data are provided for the import?
- How to get the data into the app?
- What is the automatic master data import and how does it work?
Crazy Document - Frequently Asked Questions
What needs to do ...
Crazy Beleg offers you many possibilities to adapt the app to your individual needs. Here you can read how customer or article data can be imported, what adjustments can be made, and what the options in the menu mean.
Import of Master Data
Printing and Exporting of Documents
- What are the options for printing or exporting documents?
- How to change the appearance of the document?
- How to adjust the counter of the document's number range?
- How to adjust the payment terms?
- What do you do if VAT has to be changed?
- I also need the customer and article data in the XML document. How do I do that?
- I need values in the positions including VAT. How can I get this?
XML structure for export customization (XML Mapping)
- Why do you need an XML mapping?
- How do you adjust the tag assignment?
- Can I reset the database completely?
If you have further questions that are not mentioned here, please write an email to support@crazynexus.de
Import of Master Data
How the data are provided for the import?
The data for the import are provided as an XML file. A detailed guide to creating with Microsoft Excel® can be found in the Crazy Document Wiki.
The file names for the master data must have a fixed name:
| Customer: | customers.xml |
| Items: | items.xml |
The files must be stored in your dropbox directory under "Apps/CrazyDocument" to be processed by the app.
↑How to get the data into the app?
You have prepared the data as described in chapter "How the data are provided for the import?" and copied it into your dropbox.
Start the Crazy Beleg app. To import the article data, select the entry Items from the menu And tap the Action Button  top right. If the app finds the file items.xml in your dropbox, it will be read and processed.
When importing data, the app checks to see if the item to be imported already exists in your data. The system searches for the item ID. If it is found, the item is overwritten. However, the references are retained in the documents. If the ID is not found, it will be created again.
The customer data are imported analogously to the article data described above. To do this, go to the Customers menu and tap the Action Button top right.
After a successful import you will be shown a corresponding message. If basic errors are detected during the import, an error message is displayed accordingly.

Please note that larger files may require more time to import. Allow the app to work as long as the activity indicator is visible.
↑What is the automatic master data import and how does it work?
The app can check every time you start the app, whether new master data are available. The app checks both the customer and article data to see if something has changed since the last check and a new file has been copied to your dropbox. If so, the new data can be loaded and processed automatically as described above.
To activate this function, go to the Settings -> Section "Dropbox Connection" and activate the switch for the entry Import new master data automatically. The function described above for the manual import of master data remains unaffected and is possible at any time. When the next automatic adjustment is performed, the manually imported data is recognized and no further import is carried out.
This function is disabled by default.
↑Printing and Exporting of Documents
What are the options for printing or exporting documents?
You have entered a document completely and want to close it now. For this purpose, the app offers several possibilities, which you can reach via the Action button in a displayed document:
- * Save a document without additional action
- * Print the PDF and export the document into the dropbox
- * Just Print the PDF
- * Export the Document into the Dropbox
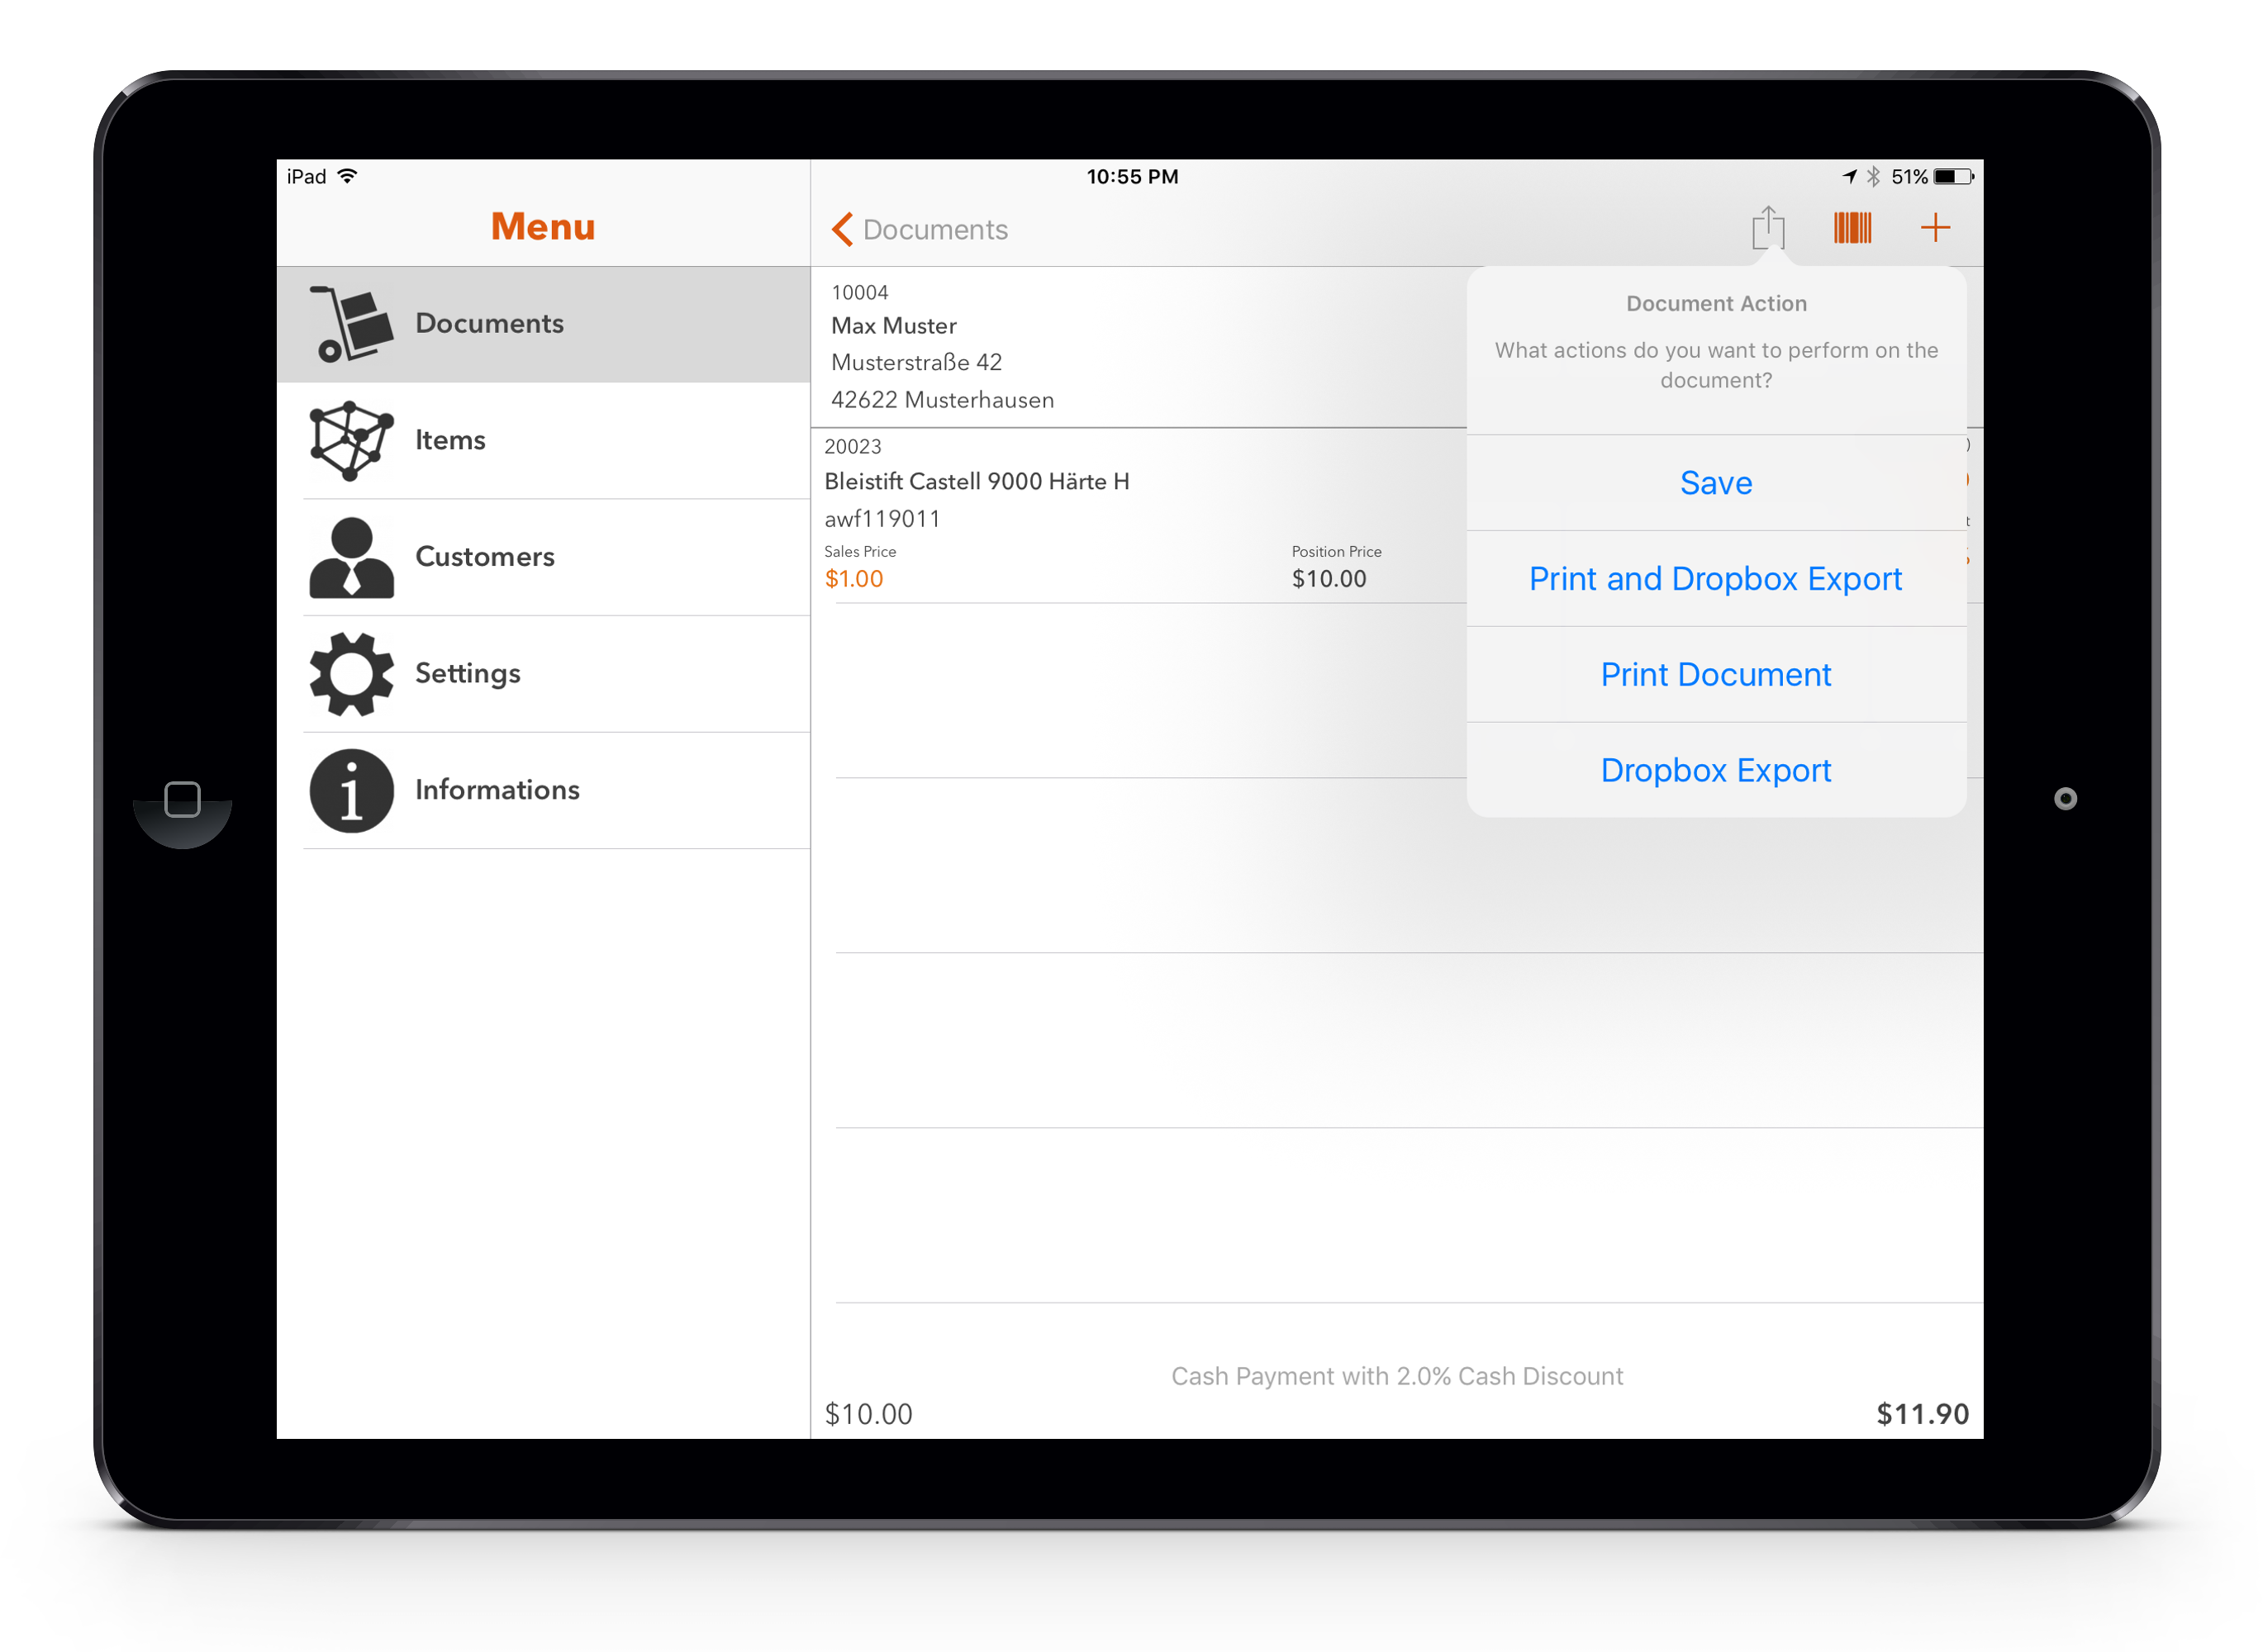
Save a document without additional action
This action stores only the current document. No data is printed or exported to the dropbox. This action is just available to save the document for later editing.
Print the PDF and export the document into the dropbox
This action will give you a preview of how your document will look printed. The document is automatically saved.
To complete a document, tap the printer button at the top right. A print dialog is displayed in which you can select the correct output channel for you. This can be, for example, an AirPrint-enabled printer that is connected to your device or another app that takes the printout for you. It can also be apps from printer manufacturers who offer the possibility to receive a document to be printed via the document exchange.
Select an available entry from the list. If the app is able to transfer the document or print to an AirPrint printer, the document is marked as processed and an XML and a PDF file are automatically saved in your Dropbox.
Just Print the PDF
This action automatically saves the document and displays a preview. From this, you can print the document as described above or save it as a PDF in your dropbox. The data is not exported as an XML file. This action is used to print a document again without changing the data.
Export the Document into the Dropbox
This action automatically saves the document and saves a new XML file in the dropbox. There is no printout or export.
↑How to change the appearance of the document?
There are several ways to customize the document. You've got the following possibilities:
- * Print the company name and bank details on the document
- * Adjust heading in the document
- * Print the total line under the document
- * Print the terms of payment
- * As an alternative to the address in the document and the bank details, you can load a graphic for the header and footer
Print the company name and bank details on the document
Your address is indispensable on a commercial document. To one, it is displayed as header information on your document, and on the other hand, your address is displayed above the customer address as sender information for a window letter. Whether you load a graphic for your head into the app or use the standard document header, you should always deposit your address. Go to the Settings and enter your address in the section Address Information.
If you do not load a graphic for the footer in the app, you can have your bank account displayed instead. Go to the Settings and add your account details in the section Bank Details.
Adjust heading in the document
The heading of the document usually indicates the type of the document. If you have not made any changes, the label "delivery note" is automatically used. You can also place Offer, Order, Invoice or other names here. Each time the document is printed it will be used. This text is also displayed on your document just before the document number.
To change the heading for the documents, go to the Settings -> Section Specification for Documents and enter your document type in Heading in the Document. Please note that when you use a graphic for the header area, the heading is no longer visible. However, the heading is still used for the designation of the document number!
Print the total line under the document
For some documents (for example delivery notes), it is not useful to display the "Total" line with the net sum of all items, the VAT, and the gross amount of the document. For this purpose, you can hide the entire area (including the payment terms). Go to the Settings -> Section Specification for Documents and deactivate the option Print Totals Row.
Print the terms of payment
In the case of some documents, it is sensible not to show any payment conditions on the document, but nevertheless to show the totals area with the net sum of all items, VAT and gross amount. Go to the Settings -> Section Specification for Documents and deactivate the option Print Payment Conditions. The terms of payment can be adapted to your requirements. You can find more information in the section "How to adjust the payment terms?".
Load the graphic for the header and footer
In order to be able to match your document to your company's letter, you can load a graphic for the document header and the document foot into the app. You can either use a JPEG or PNG file. The file should have an aspect ratio of 5:1. This means you can create a file with the dimensions of 2000: 400 points and copy it to your Dropbox folder Apps / CrazyDocument. You can also use other resolutions, but always pay attention to the aspect ratio, otherwise the graphics will be distorted. A larger resolution, increases the quality when printing the document.
To use a graphic in the document, go to the Settings -> Section Specification for Documents and select either Select document header picture or Select document footer picture. If you want to overwrite a previously selected graphic, simply select a new file from your Dropbox directory. The file will be overwritten with the new selection. If you want to delete a selected graphic completely and want to use the standard head or foot, simply tap the button with the paper basket in the upper right corner.
↑How to adjust the counter of the document's number range?
You can create the number range for your document numbers yourself. The document number consists of a numeric counter and a prefix, which can be pre-set to the counter. The prefix can be omitted, but it is imperative that you define a numeric counter.
To change the number range for the document numbers, go to the Settings -> Section Specification for Documents and change the Prefix of Document's Number Range and Document Number Range. If you have selected the sequence number too small, the app will automatically insert a new digit if the serial number should overflow. The prefix of the document number, always remains unchanged.
↑How to adjust the payment terms?
You can enter any number of payment terms in the app and use them in your documents. Note, however, that changing existing payment conditions affects all documents that have already been entered. Already exported documents are changed in the app, but the exported XML data remains unchanged.
To change the payment terms, go to the Settings -> Section Specification for Documents -> Maintain Payment Conditions. You see a list of all currently defined payment terms. To define a new payment condition, tap the Add button  top right.
Terms of payment in the Crazy Beleg App have a payment term in days and a discount. The payment goal defines the number of days in which you grant your customers a cash discount (discount price). You can store these two values in the respective fields. If you enter 0 as a payment target, you define a "cash payment". If you enter a 0 in the discount box, no cash discount is indicated in the payment terms. A payment target with 0 days and a 0 percent cash discount will therefore become a cash payment. A 14 in the payment target and a 0 in the discount results in a payment target of 14 days net. To save the payment condition, tap the "Save" button in the upper right corner.
↑What do you do if VAT has to be changed?
At the moment, the current value-added tax rates for Germany are set as default in the app. If you need to use the app outside of Germany or have to adjust the tax rates for any reason, you can do this via the Settings -> Section VAT Tax Rates. You have the two values available for this. For one thing it is the Standard Tax Rate which is also called full VAT. On the other hand you can use one Reduced Tax Rate, e.g. for food or books in Germany. Simply enter the percentage value (19 for 19.0%) in the fields.
↑I also need the customer and article data in the XML document. How do I do that?
When the app was created, I assumed that you would export the master data from your ERP system and import it into the app. The linking of customer and article data always takes place via the ID (customer number or article number) of the master record. Therefore, an export of master data usually is not required. However, there are exceptions and special requirements for which the master data must also be contained in the document XML.
You can find an option in Settings -> Section Import- und Export Options -> ExportMasterdata which is disabled by default. If you want to export the master data in your documents, activate this switch. During the next document export, the customer and article master data are also written to the XML file.
↑I need values in the positions including VAT. How can I get this?
As a rule, prices are displayed and processed in net without VAT. The VAT and the gross price are shown at the end of a document. This also writes the net value of a position in the XML file. In some cases, it is necessary to process the gross price, inclusive of the relevant value-added tax, in the positions. For this reason you can decide whether you want the total price net or gross when you export a document.
You can find an option in Settings -> Section Import- und Export Options -> ExportGross Price in Position which is disabled by default. If you want to export the gross price of the positions in your documents, activate this switch. For the next document export the prices including VAT are written into the XML file for each position.
↑XML structure for export customization (XML Mapping)
Why do you need an XML mapping?
For the import of the data there is a fixed structure and a clear identification of how the data in the XML file have to look to be successfully processed by the app. These unique identifiers (called tags) do not always match your requirements. With the XML Mapping you have the possibility to adapt the standard to your requirements and data structure.
↑
How do you adjust the tag assignment?
You can freely configure the tags of the import and export files by clicking in the Settings -> Section Import- und Export Options -> XML mapping customization. The following table shows the three XML file types for import and export. Tap an entry and you can change the tags for each individual XML file attribute.
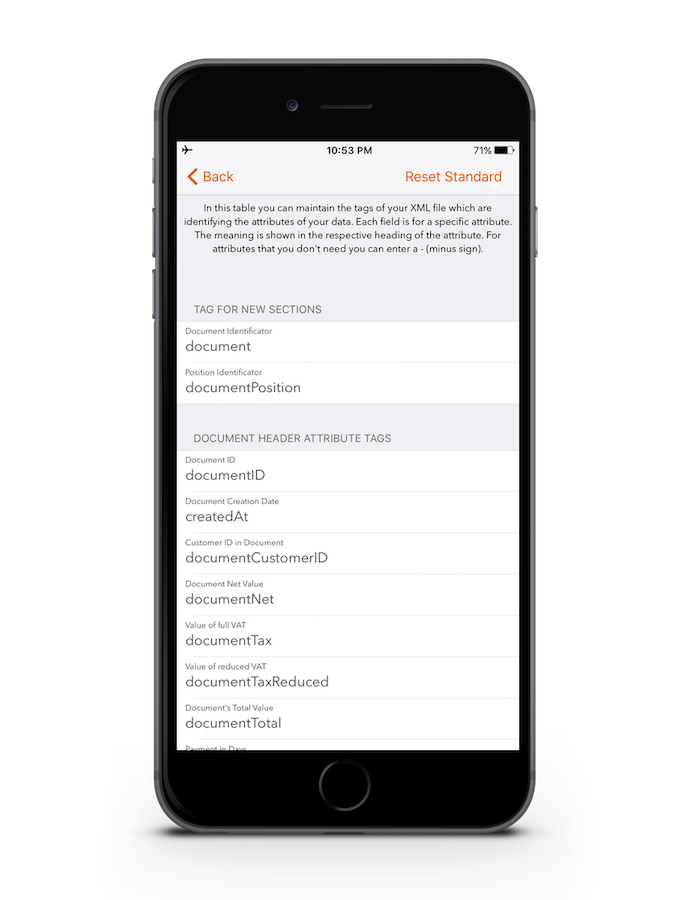
The mapping for the document is shown here in the example. You can enter the tags to be used in the XML file. The short description can be found in the description of the structure. Please note that the tags are case sensitive!
Each row represents an attribute. You can see the description in corresponding line above. If you do not need an attribute at import, you can simply ignore it. If an attribute is not found during the import, it will not be imported. An exception is the customer number and article number. These attributes must be available to import a master data record. When exporting, all attributes are written.
↑Can I reset the database completely?
If it is necessary to delete all the master data and all the documents, you can do this easily in Settings -> Section Import- und Export Options -> XML mapping customization -> Reset Database (remove all data). All customers, articles and documents are removed from the database. However, the settings and terms of payment remain intact.
You should only select this function if you really want to delete all data from the app irrevocably. It is not possible to restore the database!
↑